I found this challenge on Facebook when a friend posted that she had joined.
On 09/10 this call goes out to artists everywhere.
The first TEN artists to sign up by 09/20 (TEN days) will be accepted.
There is no fee.
Accepted artists will have until 09/30 (TEN days) to receive one of TEN boxes
containing TEN items. Those TEN items must be used, in some capacity, to create an art piece.
There are no rules.
Artists will have TEN days to complete and return their art pieces. An auction will be held at Creative Studios on 10/10. The sales will be split between the artist and the gallery.
The guest auctioneer for this event will be Sherri Columbus.
https://www.facebook.com/elblockcreative?ref=profile
I love a challenge and I love the concept of TEN! Since there wasn’t a fee to participate, I thought why not? I needed a creative kick in the butt. It’s been months since I posted here and this is the perfect opportunity to restart!
The above items are my 10 and to tell the truth there isn’t an immediate spark for ideas. So far all I see are greeting cards …We can use additional items…Stay tuned!
Day 2
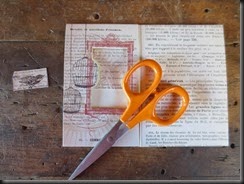
I am thinking about my “10” challenge for Creative Studios: https://www.facebook.com/elblockcreative. The ideas are streaming into my head. Unfortunately they are mostly ideas that are off shoots to the project. I start writing thoughts down on the envelope before they are lost.
Next I decide to journal my thoughts and ideas…
more thoughts…
Nothing directly related to the project. I am thinking that these journal pages need to be “arted” up…Time to do some mundane household tasks such as washing dishes to calm my brain…
Day 3
What was I thinking! This is what usually goes through my head when I begin a challenge. Let’s take the 10 items I was given and discuss each one. Please don’t misconstrue my thoughts as whining or being unhappy with what I was given. I am simply letting you into my thought process.
1. I like the image of the girl, but this is reproduction art and something I don’t want to use for the focus of my art piece.
2. A red piece of cardstock. I like the color. A bit too new looking for my tastes so I cut a sample off to test to see if it will fade.
3. A polka dot notecard. A little too shiny and new looking for my tastes. I do like polka dots and the color has possibilities.
4. Black ribbon, again like the color but not thrilled with the shine and age.
5. Assorted letters. Don’t care for the multicolors or reproduction look.
6. Reproduction note card. I like the images. Looks like someone else’s creation. Perhaps I can use the bird. I like to incorporate birds in my art.
7. A zipper end. Again new…and how would I tie this into a project?
8. Magazine page. I like that it is an actual vintage magazine page. Some interesting words. I like the book image. Not really enough to base a project on.
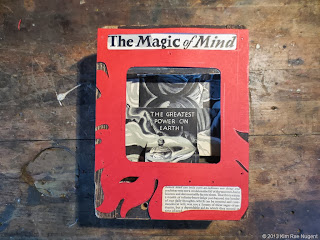
9. Another magazine page. The “Magic of Mind”. That has some possibilities.
10. Third magazine page. Hmmm perhaps an assemblage with some type of electronics.
More percolating…
Day 4
Day 4 and I haven’t even started the actual construction of my art. I do have it narrowed down to two possible ideas.
The first one is about Electricity and Electronics. Perhaps if I look through my assemblage stash I will be inspired. I am interested in vintage or antique electronics.
The second one would be based on the theme “The Magic of Mind”. It is something that I can relate to and would like to further explore.
Day 5
I finally have my idea choice! “The Magic of Mind” is the theme. I remembered that I had this glass paper weight with a half sphere shape which reminds me of a half planetary sphere. Perfect to tie into the words “THE GREATEST POWER ON EARTH”. I move the paper weight around the human figures and fire. I like how the curved glass distorts and magnifies the image depending on the angle I look through it. I conclude that I like it placed over the words themselves.
Next I contemplate a choice for a substrate. I am considering digging up some wooden boxes but then this industrial wood casting mold catches my eye. So I place the glass paperweight on top and I am pleased with how they relate to one another. I need way to attach the glass paperweight to the wooden casting mold.
Playing with placement ideas. I have begun to cut the magazine page apart. In retrospect I would have liked to print a copy to experiment with, then remember my printer/scanner is out of ink anyways.
I need something above the words “THE GREATEST POWER ON EARTH”
Hmmm…
I think that the bottom of the chair will work. I also need imagery to fill up the space inside of the wooden substrate.
So I cut off the excess and reposition it elsewhere. I affix the images to a piece of acid free paper to help act as a buffer between the wood and newspaper.
That fills the space enough for my tastes.
Next I begin cutting out parts from each of the 10 items to make sure that I incorporate all into the design.
I check both sides before cutting so that I don’t ruin an image or words that I like better.
A bird for thought…
I decide to make a name plate for the backside of my assemblage. I like to make the backside of my art interesting as well.
“M” for Mind and Magic.
After looking through the ephemera several more times I think that I have removed all that I can use. I should just wait….but I can’t resist.
So I start to construct ATC’s. One for each of the other 9 participating artists plus 1 for the host = TEN.
This is so much fun! Working on 10 cards at once. Trying to think up different combinations. Trying to make several different themes and styles just using the leftovers from my TEN challenge packet. I should really get back to work on my challenge piece…
Day 6
I think that my assemblage needs a finial on the top. Which one do you prefer?
I haven’t made my decision yet.
Next I need to create a metal piece to hold the glass paperweight onto the wooden substrate. So I draw and cut out a loose paper pattern of what I want, just to get an idea how it would look.
I need to convert a 2 dimension pattern into 3D. This gives me ideas of how various curved flames will work.
Instead of starting from scratch each time, I decide to draw a precise master template to work from. I make copies of the ephemera that I am going to incorporate and tack these in place. Quite a difference from the first pattern.
When I am pleased with the design I print a copy of the master template.
I cut the copy out, fold it and place over the glass paperweight and wood base.
I contemplate how the curves and and placement looks on each side.
Some parts are redrawn and cut differently.
Now is the time for changes. It’s only paper!
No matter how much planning I do, I know that the translation always looks different in metal.
Then I take this pattern and place it over the master template tracing the corrections.
The pattern is ready!
The next day is going to involve A LOT of sawing!
Day 7
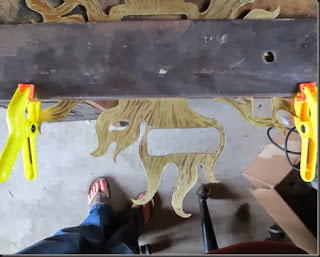
All ready to begin sawing.
Making progress, just replaced another blade. The sun is shining and I am enjoying it’s warmth through the window!
Next, I need to cut out the interior spaces.
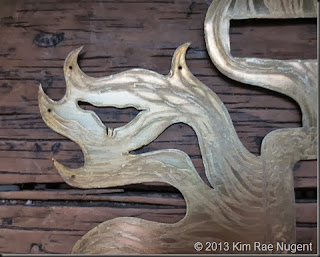
Several hours later and about 14 broken blades and the sawing is done! The large size was cumbersome to work with.
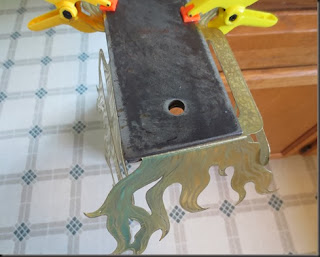
View from the backside to give you an idea what the brass looks like.
Some filing to smooth out imperfections.
My workspace is a mess! Time to clean up and quit for the day.
Day 8
A little more filing and now it’s time to think about etching. I sand the entire front surface with fine grit sandpaper. Next I tape cut out copies of the printed text to the backside of the metal to help me visualize the finished project. Then I put packing tape over the entire backside. The tape is sticky and I don’t want to spend the time to cut away all of the excess. So I try sticking tissue paper to it, which is only mildly successful.
Free flowing lines to mimic creative energy, thoughts and ideas flowing from the mind. This design is drawn directly on the metal with a sharpie marker.
All done and ready to etch! Two more days of work left.
Day 9
The etching is complete. The metal has been cleaned with a very fine steel wool pad.
A close-up view of the cut out for the bird, my favorite portion of the metal plate. On to day 10. My final day and there is a lot to accomplish!
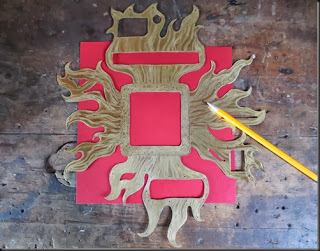
I decide the red cardstock would make a nice compliment to the etched metal plate and weathered wood of the base.
Time to bend the metal plate to conform to the glass paperweight and wooden base.
Safety Tip: It would be wise to wear protective foot gear rather than sandals for this step.
My husband gave me these two steel plates to use as a tool to bend metal. I simply place the brass between the two plates. Then use some clamps to help hold in place.
Next bend the brass down using my hands. This is 28 gauge brass so it bends rather easily.
I end up bending the rest of the brass in the kitchen over the counter so that I have more room to work. My art always tends to spill over into the kitchen/dining area.
Checking the fit over the glass paperweight.
Pencil marks for next set of bends.
A little maneuvering and the bends are working.
Two sets of bends done!
Another check for fit.
I use the original pattern template to help me figure out the opening for the glass paperweight.
It fits!
I tacked the metal in place and then drew around the brass with a pencil to mark my cutting lines for the red cardstock. I cut the cardstock with an craft knife.
First layer with inspirational magazine page.
Notice the tripod over the fire in the magazine image, that fits into the niche, on the lower left side…
…I cut a little opening to peek through.
Second layer, the red cardstock. ( I forgot to show the “Magic of Mind” title and descriptive text in the first layer picture. Too late now)!
Third layer mica sheets to protect the text and opening.
FINISHED!
The Magic of Mind
THE GREATEST POWER ON EARTH!
It has been quite a journey since I received the above ten items. From here to:
FINISHED!
I decided to use the finial with the three spheres. I chose this finial because I felt that it complimented the retro feel of the magazine page plus it echoes the sphere shape of the glass paperweight.
View the film below to look at different views from the glass sphere plus the sides and close-ups of this art piece.
Left side
Left side close-up view of bird
Top view
Right side
Close-up view from right side
Bottom view
So far I have shown you how I incorporated six of the ten items I was given. Below shows how I included the remaining 4 items.
I made a name tag with information about the challenge.
This was attached to the backside of the art piece.
These are the finished artist trading cards for the nine other artists who participated in the challenge plus one ATC notecard for Erika Block of Creative Studio, the host of the challenge.
If the other artists leave me a comment with the ATC that they would like to receive, plus contact information, I would be happy to send them that one. First come, first serve (plus you need to have actually finished your challenge).


No comments:
Post a Comment