
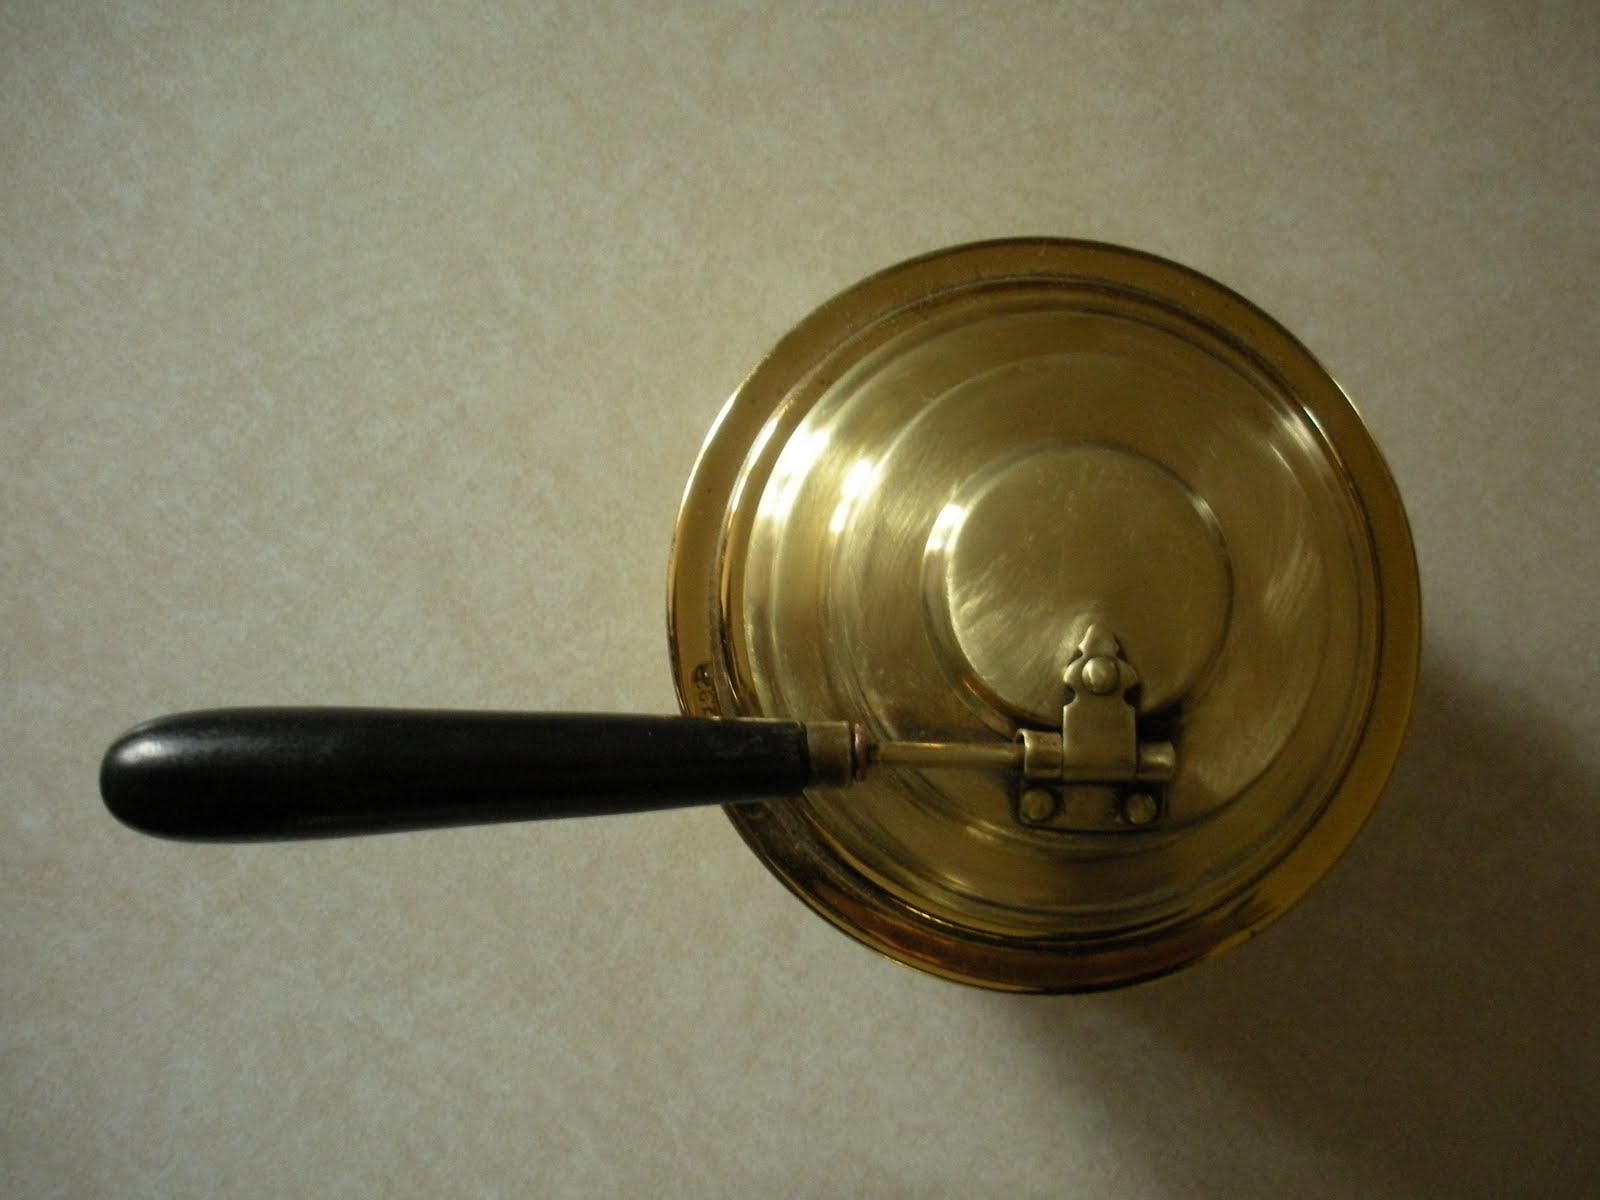
I bought a brass burner this Summer at a church rummage sale in Cedarburg. I have had the idea to make it into a necklace ever since.
I'm glad to finally get started. Jill Shulse, Thomas Mann and Keith Lo Bue are artist's whose work has inspired me in the creation of this necklace. I hope my work reflects inspiration versus copying.

The cover with it's door that opens and closes is the part of the burner that I want to use for this project. The bottom of the burner also has an interesting shape and perhaps will be used in a future project.

The next step for me was to find some type of theme or direction for the piece to take. This engraving from a 1800's book was just what I was looking for. I ponder using the title "A Royal Pickpocket" somewhere in my piece but it is not quite the direction I am looking for.

I cut out two circles, for the front and the back.

Next to find a quote or write a verse for this piece. The story included with the picture doesn't yield something for me to quote. The man appears to be dreaming so I look up quotes with "dreaming"as the key work...nothing. The pickpocket seems to be stealing a message from the dreamer. Nothing that I write seems sophisticated or mysterious enough. I look up Keith Lo Bue's work. His title's are thought provoking and I want this for my art. I look up a few words in the dictionary and this is what I come up with - SECRET DEVOTIONS OF THE DREAMER LIFTED IN A SURREPTITIOUS MANNER. I love the word "Surreptitious" and after a few days I think that I can finally pronounce it :) There are certain words that I have trouble pronouncing or remembering how to pronounce. My Grandma had this challenge also.

In order to letter this I write it upside down. It is really bothering me that the lettering is upside down so I remove the handle and turn it around. It is not until that I am almost done that I realize the handle now covers part of the lettering. After going back and forth several times, I decide I would rather have the handle cover part of the lettering than to have it upside down.

Final fit for the dreamer.

I had been using plexiglass for my previous projects but was looking for something more natural and aged looking to use. Mica was the answer.Unfortunately I didn't buy the mica at Valley Ridge that I was considering when I was there. I was trying to watch my expenses and had no ideas for it at that time anyways. Mica is not easy to find locally, and in the midst of a project I hate waiting for supplies to arrive via snail mail. Fortunately my friend Jill Shulse had a piece of that I could use :)

Mica arranged over picture for best look.

I decided to cut out the hand to emphasize it. Then drew the rest of the figure on a brass circle and etched it. This will be the plate for the back side of the necklace. I want the back of my work to be as finished as the front.

Close-up of two pieces together.

Mica arranged so that the least amount of spots show.

A brass key hole escutcheon to help protect the "Secret devotions".

A slot cut out from the backing plate that I made to go with the key hole escutcheon. Phrase from the story that came with the engraving.

Working out the arrangement of the necklace. Keys to enhance the theme I am developing. Wooden beads to compliment the wooden handle of the cover. I am also considering an asymetrical design to help balance the wooden handle.

More pieces to consider.

The finished necklace. I had one piece of brass chain from a vintage necklace. Adding a second and different chain gave me the weight I was looking for, plus more variety to the design. I also attached another key that looked like it could work with the key hole escutcheon. I feel this helped to further balance the large handle on the cover.

The clasp is made from a clock part and a nut (from a set of nuts at the dentist's estate sale). After letting it set for a couple of days I still need to redo the wiring on the clasp. It looks to messy for the style of the rest of the necklace and I have thought of a way to make it more neat in appearance.

The backside.

The front with door open. I'm still considering if I want to add something to the inside of the door...
 I bought a brass burner this Summer at a church rummage sale in Cedarburg. I have had the idea to make it into a necklace ever since. I'm glad to finally get started. Jill Shulse, Thomas Mann and Keith Lo Bue are artist's whose work has inspired me in the creation of this necklace. I hope my work reflects inspiration versus copying.
 The cover with it's door that opens and closes is the part of the burner that I want to use for this project. The bottom of the burner also has an interesting shape and perhaps will be used in a future project.
 The next step for me was to find some type of theme or direction for the piece to take. This engraving from a 1800's book was just what I was looking for. I ponder using the title "A Royal Pickpocket" somewhere in my piece but it is not quite the direction I am looking for.
 I cut out two circles, for the front and the back.
 Next to find a quote or write a verse for this piece. The story included with the picture doesn't yield something for me to quote. The man appears to be dreaming so I look up quotes with "dreaming"as the key work...nothing. The pickpocket seems to be stealing a message from the dreamer. Nothing that I write seems sophisticated or mysterious enough. I look up Keith Lo Bue's work. His title's are thought provoking and I want this for my art. I look up a few words in the dictionary and this is what I come up with - SECRET DEVOTIONS OF THE DREAMER LIFTED IN A SURREPTITIOUS MANNER. I love the word "Surreptitious" and after a few days I think that I can finally pronounce it :) There are certain words that I have trouble pronouncing or remembering how to pronounce. My Grandma had this challenge also.
 In order to letter this I write it upside down. It is really bothering me that the lettering is upside down so I remove the handle and turn it around. It is not until that I am almost done that I realize the handle now covers part of the lettering. After going back and forth several times, I decide I would rather have the handle cover part of the lettering than to have it upside down.
 Final fit for the dreamer.
 I had been using plexiglass for my previous projects but was looking for something more natural and aged looking to use. Mica was the answer.Unfortunately I didn't buy the mica at Valley Ridge that I was considering when I was there. I was trying to watch my expenses and had no ideas for it at that time anyways. Mica is not easy to find locally, and in the midst of a project I hate waiting for supplies to arrive via snail mail. Fortunately my friend Jill Shulse had a piece of that I could use :)
 Mica arranged over picture for best look.
 I decided to cut out the hand to emphasize it. Then drew the rest of the figure on a brass circle and etched it. This will be the plate for the back side of the necklace. I want the back of my work to be as finished as the front.
 Close-up of two pieces together.
 Mica arranged so that the least amount of spots show.
 A brass key hole escutcheon to help protect the "Secret devotions".
 A slot cut out from the backing plate that I made to go with the key hole escutcheon. Phrase from the story that came with the engraving.
 Working out the arrangement of the necklace. Keys to enhance the theme I am developing. Wooden beads to compliment the wooden handle of the cover. I am also considering an asymetrical design to help balance the wooden handle.
 More pieces to consider.
 The finished necklace. I had one piece of brass chain from a vintage necklace. Adding a second and different chain gave me the weight I was looking for, plus more variety to the design. I also attached another key that looked like it could work with the key hole escutcheon. I feel this helped to further balance the large handle on the cover.
 The clasp is made from a clock part and a nut (from a set of nuts at the dentist's estate sale). After letting it set for a couple of days I still need to redo the wiring on the clasp. It looks to messy for the style of the rest of the necklace and I have thought of a way to make it more neat in appearance.
 The backside.
 The front with door open. I'm still considering if I want to add something to the inside of the door...
12 comments:
Gorgeous!!! And once again, i just LOVE the step by step! It's so cool to see someone else's processes in design.
That is absolutely stunning!
Just amazing work! I wish I had your talent!
wow! a very, very nice piece, kim! you DO have a gift... :}
wow!-this is a great piece of art-I really admire all the time and thought you put into the theme for it-the step by step description was great too-thanks for sharing
your etching is fantastic!!
Wow I saw this on Mixed Media Art and came right over to see!!! This is an amazing and inspiring piece Kim. You did an absolutely fabulous job. It was so interesting seeing your process so thanks for sharing that too.
Thank you everyone for your kind words and comments!
That is a beautiful piece, Kim and thank you for taking us through your thinking/creative process. Lovely ride! Am very glad to have found your blog!
You are divinely creative. The process photos are fabulous, near to being in your expansive and colorful mind. I will say someday, I knew her before the world found out about her.
And it looks even better in person!!!
I love the necklace Kim! It's awesome to see the step by step behind the end result of your project. Such creative and talented girl you are!
Post a Comment